程序一定会有错误的时候
天才的程序员说,我的程序绝对OK,没有错误,我从不处理错误。的确,天才程序员的程序从来没有错误,但程序只要运行,就会有错误!不管你信不信,我反正是信的。
错误不只是来自于程序逻辑,更多的来自于环境:
- 数据库连接数太多,程序连接数据库失败
- 网络连接故障,连接缓存服务器失败
- Redis缓存已满,无法写入
- 合作方接口异常,无法正常响应
……
太多了,变化的环境总是挑战我的想象力。
真正的程序员很重视错误处理,让程序固若金汤。真正的PHP程序员哪怕是Notice也不放过 :)
首先,要注意和错误有关的PHP配置变量。以下是PHP.ini中的默认值。
display_errors = Off
error_reporting = E_ALL & ~E_NOTICE & ~E_STRICT & ~E_DEPRECATED
这是建议开发环境中设置的值:
display_errors= On
error_reporting = E_ALL
这是建议服务器环境中设置的值:
display_errors= Off
error_reporting = E_ALL & ~E_DEPRECATED & ~E_STRICT
PHP中错误报告的级别
以下列出常用的错误报告的级别,所有错误报告的级别点这里
| 值 |
常量 |
描述 |
| 1 |
E_ERROR |
致命的运行时错误。后果是导致脚本终止不再继续运行。 |
| 2 |
E_WARNING |
运行时警告 (非致命错误)。仅给出提示信息,但是脚本不会终止运行。 |
| 4 |
E_PARSE |
编译时语法解析错误。解析错误仅仅由分析器产生。 |
| 8 |
E_NOTICE |
运行时通知。 |
| 256 |
E_USER_ERROR |
致命的用户生成的错误。这类似于程序员使用 PHP 函数 trigger_error() 设置的 E_ERROR。 |
| 512 |
E_USER_WARNING |
非致命的用户生成的警告。这类似于程序员使用 PHP 函数 trigger_error() 设置的 E_WARNING。 |
| 1024 |
E_USER_NOTICE |
用户生成的通知。这类似于程序员使用 PHP 函数 trigger_error() 设置的 E_NOTICE。 |
| 2048 |
E_STRICT (integer) 启用 PHP 对代码的修改建议,以确保代码具有最佳的互操作性和向前兼容性。 |
| 4096 |
E_RECOVERABLE_ERROR |
可捕获的致命错误。类似 E_ERROR,但可被用户定义的处理程序捕获。 |
| 8192 |
E_DEPRECATED |
运行时通知。启用后将会对在未来版本中可能无法正常工作的代码给出警告。 |
| 8191 |
E_ALL |
所有错误和警告,除级别 E_STRICT 以外。 |
E_WARNING
php -r 'error_reporting(E_ERROR);include "test.php";'
//Warning: include(test.php): failed to open stream: No such file or directory in Command line code on line 1
E_NOTICE
php -r 'error_reporting(E_ERROR);echo $a[0];'
//Notice: Undefined variable: a in Command line code on line 1
E_PARSE
php -r 'error_reporting(E_ERROR);echo 0'
//Parse error: syntax error, unexpected end of file, expecting ',' or ';' in Command line code on line 1
E_USER_WARNING
php -r 'error_reporting(E_ERROR);trigger_error("Value must be 1",E_USER_WARNING);'
//Warning: Value must be 1 in Command line code on line 1
E_USER_ERROR
php -r 'error_reporting(E_ERROR);trigger_error("Value must be 1",E_USER_ERROR);'
//Fatal error: Value must be 1 in Command line code on line 1
E_USER_NOTICE
php -r 'error_reporting(E_ERROR);trigger_error("Value must be 1",E_USER_NOTICE);'
//Notice: Value must be 1 in Command line code on line 1
E_ERROR
php -r 'error_reporting(E_ERROR);$a=null;echo $a->method();'
//Fatal error: Call to a member function method() on a non-object in Command line code on line 1

php -r 'error_reporting(E_ERROR);require_once("test.php");'
//Warning: require_once(test.php): failed to open stream: No such file or directory in Command line code on line 1
//Fatal error: require_once(): Failed opening required 'test.php' in Command line code on line 1
用set_error_handler捕获错误
set_error_handler:设置一个用户的函数来处理脚本中出现的错误。
使用set_error_handler捕获程序错误
php -r ‘error_reporting(E_ERROR);
set_error_handler(function($errno, $errstr, $errfile, $errline){var_dump($errno, $errstr, $errfile, $errline);});
require(“test.php”);
echo “finished!”;’

从截图中看到,有var_dump的信息,说明set_error_handler捕获到了错误。并且没有看到我需要输出的finished!,说明程序在遇到错误终止了,没有继续运行。
set_error_handler不是万能的,也有捕获不到的时候
php -r 'error_reporting(E_ERROR);
set_error_handler(function($errno, $errstr, $errfile, $errline){var_dump($errno, $errstr, $errfile, $errline);});
$a=null;$a->method();
echo "finished!";'

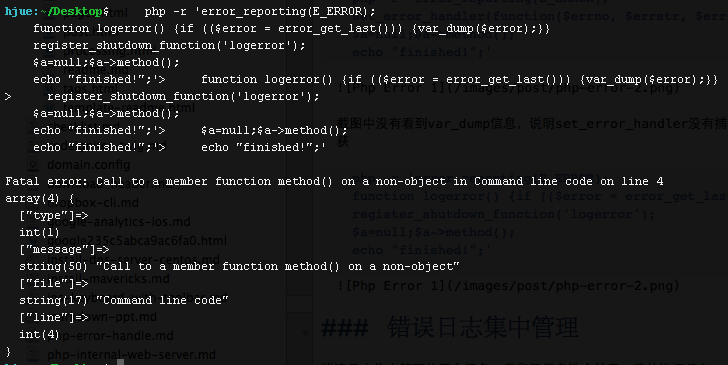
截图中没有看到var_dump信息,说明set_error_handler没有捕获到错误。这时候要用register_shutdown_function+error_get_last来捕获
php -r 'error_reporting(E_ERROR);
function logerror() {if (($error = error_get_last())) {var_dump($error);}}
register_shutdown_function('logerror');
$a=null;$a->method();
echo "finished!";'
错误日志集中管理
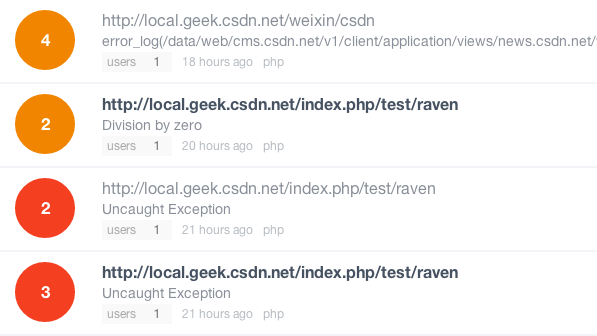
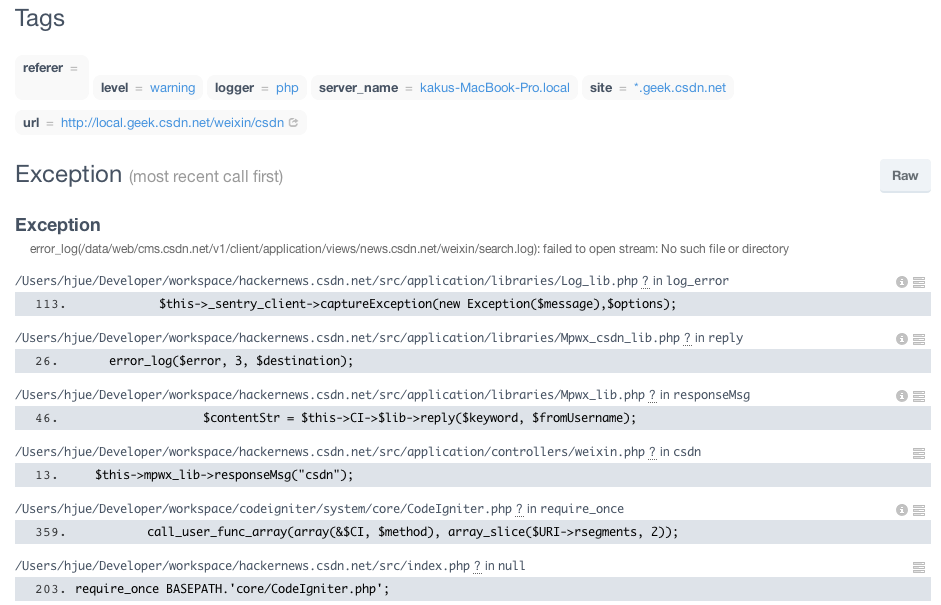
错误日志集中管理的平台很多,我们无需多造个轮子。我的选择是Sentry。
Sentry是一个的错误日志服务器,可以将程序错误的详细情况集中捕获,并提供一个很漂亮的Web界面来浏览错误。 Sentry本身是用python写的,但它支持记录python、php、ruby、iOS等多种语言的错误。