悲剧!提交苹果商店的App被拒

悲剧!提交苹果商店的App被拒

上周提交了一款CSDN活动的App,App中有把添加活动电子票到Passbook的功能,就是这个功能导致了被拒。
以下是苹果反馈的被拒原因:

Reasons
23.2: Passes must include valid contact information from the issuer of the pass or the app will be rejected and Passbook credentials may be revoked
23.2
Your app includes a Passbook Pass that does not contain valid contact information from the issuer of the Pass.
Please revise your Passbook Pass to include valid information for contacting the issuer.
For more information on Passbook Passes, please see Getting Started with Passbook
image
App截图:Pass正面
image
App截图:Pass背面

Pass的背面已经有了联系信息,为什么被拒的原因是没有包含有效的联系信息呢?

研究了点评、糯米的App,Pass的联系信息也就是这些啊,真搞不懂啊,求大神帮助。

NSRegularExpression Cheat Sheet and Quick Reference

NSRegularExpression Cheat Sheet and Quick Reference

Special Characters

*?+[(){}^$|\./

Operators

Pattern Description
\ Or
* 0 or more times. Match as many times as possible.
+ 1 or more times. Match as many times as possible.
? 0 or 1 times. Prefer 1.
*? 0 or more times. Match as few times as possible.
+? 1 or more times. Match as few times as possible.
?? 0 or 1 times. Prefer 0.
*+ 0 or more times. Match as many times as possible when first encountered, do not retry with fewer even if overall match fails (Possessive Match).
++ 1 or more times. Possessive match.
?+ 0 or 1 times. Possessive match.
{n} {n}? {n}+ Exactly n times.
{n,} n or more.
{n,}? At least n times, but no more than required for an overall pattern match.
{n,m} Between n and m times.
{n,m}? Between n and m times. Match as few times as possible, but not less than n.

Anchors

Pattern Description
^ Beginning of a line.
$ End of a line.
\A Beginning of an input. Doesn’t match after a new line within the input.
\z End of input.
\Z End of input, but before the final line terminator, if one exists.
. Any character.
\ Quote (escape) following character.

Character Classes

Pattern Description
\b Word boundary, if outside of a [Set]. BACKSPACE, if within a [Set].
 \B Not word boundary.
 \s White space character.
\S Non-white space character.
\d Digit character.
\D Non-digit character.
\w Word character.
\W Non-word character.

Groups and Ranges

Pattern Description
(…) Capturing parentheses (capturing group).
(?:…) Non-capturing parentheses. Matches but doesn’t capture. Somewhat more efficient than capturing parentheses.
(?!…) Negative look-ahead. True if the parenthesized pattern does not match at the current input position.
[…] Any one character in the set.
[^…] Negated set. Not any one in the set.

使用shell生成icns文件

正在做Mac版PHP手册,做图标的时候,发现在Developer tool里竟然没有Icon Composer了。这是什么情况?网上搜索了一下发现,自Xcode4.4以后就不再提供这个工具了。因为Xcode发展到4.4的时候,MBP已经出了15寸的Retain屏了。为了支持高清显示,苹果提供了一个工具iconutil,用来生成支持高清设备的图标。
Apple的官方文档:High Resolution Guidelines for OS X

大体的制作过程是:

准备一个叫icon.iconset的文件夹,在里面放下面这些图标:
icon_16x16.png
icon_16x16@2x.png
icon_32x32.png
icon_32x32@2x.png
icon_128x128.png
icon_128x128@2x.png
icon_256x256.png
icon_256x256@2x.png
icon_512x512.png
icon_512x512@2x.png
然后用 iconutil -c icns 得想到要的icns文件。
整个过程可使用shell生成,准备好512x512的logo(icon.png)

#make_osx_icon icon.png
for size in 16 32 128 256 512 ;
do
  echo $size;
  sips -s format png -Z $size $1  --out icon.iconset/${1%.png}_${size}x${size}.png ;
  retina=$(expr $size \* 2 )
  echo $size@2x;
  sips -s format png -Z $retina $1  --out icon.iconset/${1%.png}_${size}x${size}@2x.png ;
done
iconutil -c icns icon.iconset

Compile Zeal on Mac OS X

用Mac做开发的同学一般都知道Dash, 它是个离线的 API 文档搜索 + 浏览工具。Dash一开始在Appstore上是免费的,支持的文档也不多。后来用的人逐渐多了起来,很多开发者主动贡献了自己制作的文档。而Dash这个时候推出了收费版,免费版加了各种限制,让你用起来不爽,不是不爽,简直是没法用。作为早期的Dash用户,我还向周边的朋友推荐了它。一般来说,对于当下免费的功能以后打算收费,在软件发布的时候会给用户提示,常见的做法是对功能做时间显示。而Dash的做法是,一开始全部功能免费,对于今后打算收费的计划只字不提,用户给与好评、推荐,照单全收,还有很多用户贡献的文档库也据为己有。
对于这种软件的作者坚决不支持、不购买。
Zeal是基于QT做的一个离线文档浏览工具,免费并且开源。不过和Dash比起来,功能上还很残… 不过还是可以用的。Zeal毕竟是使用了Dash的文档库,为了不和Dash(Dash只有Mac版)冲突,Zeal没有提供Mac下载。然而QT是跨平台的,可以用源码编译生成Mac上的安装包。

准备工作

安装X11

首先要安装x11,因为从Mountain Lion开始,Mac已经删除了x11
这个是来自Apple的文档,里面Mac不再支持X11的说明 http://support.apple.com/kb/HT5293
Install X11 http://xquartz.macosforge.org/landing/

安装QT5

brew install qt5

开始编译

$ git clone https://github.com/jkozera/zeal.git
$ cd zeal/zeal
$ /usr/local/opt/qt5/bin/qmake
$ make

生成安装包

$ /usr/local/opt/qt5/bin/macdeployqt zeal.app -dmg

Zeal

我已经把安装包上传到了新浪微盘,懒得折腾的同学在这里下载

长滩你好(4天3晚自由行)


↑图: 这里是菲律宾卡里波机场出口。卡里波机场是我见过最小的机场。只有一条跑道,飞机降落后需要掉头开到停机坪。

路过一个很别致的酒店

汉娜酒店很不错,温馨亲切,有家般的感觉,一直微笑服务,有问必答。


长滩的落日很壮观,如果白天云层丰富,日落就会漂亮


一边是暴雨,一边是晴天,彩虹是分界线。没带广角,拍不下整条彩虹。

暴雨覆盖了整个天空,我在教堂躲雨中

长滩美中不足的是绿藻,不过靠近Nami的区域是没有的绿藻的。

Yellow Cab的薄底Pizza拼盘,味道不错,炸鸡翅非常好,外焦里嫩。


长滩岛的螃蟹船(Banca Boat),船的两侧各有四根外伸出去的支架,因样子有些像螃蟹的脚而得名

我就是坐这个船出海的,没有动力,靠风帆,很环保。

沙滩边就是酒店和饭店,吃饭、游泳,休息,随时都可以,方便极了。

可以站在这种板上划着出海,看似简单,实际上站在上面都很困难。

著名的Fridays酒店。

Nami餐厅是建在山上的,需要乘电梯上去。

在Nami餐厅看长滩海湾美极了

Gumamela Resort - Hillside,半山上的酒店,要爬60级台阶。老板很nice,主动送了我们免费的早餐。

海鲜市场D’Talipapa,自己买海鲜,然后拿到旁边的加工店加工。

phantomjs网站截图

yum install fontconfig
yum install fontconfig-devel
用phantomjs去截取中文页面的网站可能会出现乱码的情况,也就是截图中中文的位置全是方框。
解决办法就是安装字体。
在centos中执行:yum install bitmap-fonts bitmap-fonts-cjk
在ubuntu中执行:sudo apt-get install xfonts-wqy
这样再去截图中文的页面就不会出现一堆的方框了。
yum install bitmap-fonts bitmap-fonts-cjk
phantomjs rasterize.js http://ariya.github.com/svg/tiger.svg tiger.png
https://github.com/ariya/phantomjs/wiki/Screen-Capture
yum install cjkuni-fonts-ghostscript.noarch
yum install kde-i18n-Chinese.noarch
set LANG=zh_CN.UTF8

MySQLDump备份注意事项

MySQLDump备份数据库时默认是不备份存储过程、函数、触发器、事件的,难道这些不重要?
查看数据库中的存储过程、函数、触发器、事件,可以用以下命令查询。
show procedure status;
show function status;
show triggers;
show events;

不明白为什么MySQL在设计查询语句时,查看存储过程和函数,需要多加个status
如果使用MySQLDump备份时,需要导出存储过程、函数、触发器、事件,可添加如下参数。
–routines # 存储过程和函数
–triggers # 触发器
–events # 事件
PS:--no-data参数可以不导出数据。

Nginx和PHP配置备忘

使用PHP5.5.x

使用PHP5.5.x可大幅度提高Webserver负载能力,详细看这里

Nginx配置

Nginx worker_processes

max_clients = worker_processes * worker_connections
worker_processes  1;
worker_connections  1024;

worker_processes的数值一般设置为内核数

$ cat /proc/cpuinfo |grep processor
processor       : 0
processor       : 1
processor       : 2
processor       : 3
processor       : 4
processor       : 5
processor       : 6
processor       : 7

根据查到的内核数,这里我们配置worker_processes为8
worker_processes 8;

隐藏 Nginx Server Tokens

server_tokens在Nginx配置文件的http/server/location部分设置。
server_tokens off;

Nginx Request / Upload Max Body Size (client_max_body_size)

client_max_body_size的默认值是1m,如果你的网站需要上传大于1m的文件,设置client_max_body_size为你需要的值。否则,在你上传超过client_max_body_size的文件时,Nginx会返回给你413错误,告诉你“Request Entity Too Large” 。
client_max_body_size在Nginx配置文件的http/server/location部分设置。

client_max_body_size 20m;
client_body_buffer_size 128k;

缓存静态文件

location ~* \.(jpg|jpeg|gif|png|css|js|ico|xml)$ {
    access_log        off;
    log_not_found     off;
    expires           360d;
}

启用gzip

gzip_proxied any;
gzip_types 
    text/css
    text/plain
    text/javascript
    application/javascript
    application/json
    application/x-javascript
    application/xml
    application/xml+rss
    application/xhtml+xml
    application/x-font-ttf
    application/x-font-opentype
    application/vnd.ms-fontobject
    image/svg+xml
    image/x-icon
    application/rss+xml
    application/atom_xml;

gzip_comp_level 9;
gzip_http_version 1.0;
gzip_vary on;
gzip_buffers 16 8k;
gzip_min_length 50;

把PHP请求交给PHP-FPM

location / {
        try_files $uri $uri/ /index.php$uri?$args;
}
location ~* \.php {
    fastcgi_pass 127.0.0.1:9000;
    fastcgi_index index.php;
    include fastcgi_params;
    fastcgi_split_path_info ^(.+\.php)(/?.*)$;
    fastcgi_param PATH_INFO $fastcgi_path_info;        
    fastcgi_param SCRIPT_FILENAME $document_root$fastcgi_script_name;
}

禁止访问隐藏文件

location ~ /\. {
    access_log off;
    log_not_found off; 
    deny all;
}    

配置PHP-FPM

PHP-FPM 基本配置

emergency_restart_threshold 10
emergency_restart_interval 1m
process_control_timeout 10s

配置PHP-FPM Pool 进程

pm.max_children是PHP-FPM Pool 最大的子进程数,他数值取决于你的服务器内存。
假设你打算给1G内存给当前配置的PHP-FPM Pool,一般一个PHP请求占用内存10M-40M,我们按站点每个PHP请求占用内存25M,这样max_children = 1G/25M = 40.96。
这样,我设置pm.max_children为40. max_requests是每个子进程重生之前处理的请求数, 默认值为unlimited,设置为2000主要是为了避免内存泄露带来的问题

pm = dynamic
pm.max_children = 40
pm.start_servers = 15
pm.min_spare_servers = 10
pm.max_spare_servers = 20
pm.max_requests = 2000

PHP-FPM Pools Configuration

建议不同站点使用不同的PHP-FPM Pool,绑定在不同的端口。这样一个站点出问题,不至于影响其他的站点。同时,如果php-fpm进程占用CPU过高,也可以很快定位有问题的站点。

下边配置了两个PHP-FPM Pool,绑定了9000和9001两个http端口

/etc/php-fpm.d/site.conf

[site]
listen = 127.0.0.1:9000
user = site
group = site
request_slowlog_timeout = 5s
slowlog = /var/log/php-fpm/slowlog-site.log
listen.allowed_clients = 127.0.0.1
pm = dynamic
pm.max_children = 5
pm.start_servers = 3
pm.min_spare_servers = 2
pm.max_spare_servers = 4
pm.max_requests = 200
listen.backlog = -1
pm.status_path = /status
request_terminate_timeout = 120s
rlimit_files = 131072
rlimit_core = unlimited
catch_workers_output = yes
env[HOSTNAME] = $HOSTNAME
env[TMP] = /tmp
env[TMPDIR] = /tmp
env[TEMP] = /tmp

/etc/php-fpm.d/blog.conf

[blog]
listen = 127.0.0.1:9001
user = blog
group = blog
request_slowlog_timeout = 5s
slowlog = /var/log/php-fpm/slowlog-blog.log
listen.allowed_clients = 127.0.0.1
pm = dynamic
pm.max_children = 4
pm.start_servers = 2
pm.min_spare_servers = 1
pm.max_spare_servers = 3
pm.max_requests = 200
listen.backlog = -1
pm.status_path = /status
request_terminate_timeout = 120s
rlimit_files = 131072
rlimit_core = unlimited
catch_workers_output = yes
env[HOSTNAME] = $HOSTNAME
env[TMP] = /tmp
env[TMPDIR] = /tmp
env[TEMP] = /tmp

这段代码放在 /etc/php-fpm.conf 中,加载多个php-fpm pool

include=/etc/php-fpm.d/*.conf
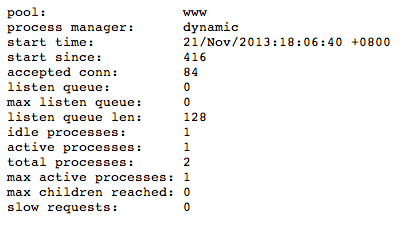
开启PHP-FPM状态信息页

php-fpm.conf配置文件要启用以下选项:

pm.status_path = /status

在Nginx配置的server部分增加以下配置:

location ~ ^/(status)$ {
     access_log off;
     include fastcgi_params;
     fastcgi_pass 127.0.0.1:9000;
     fastcgi_param SCRIPT_FILENAME $document_root$fastcgi_script_name;
}

访问http://localhost/status 查看php-fpm状态

Php Fpm Status

升级到PHP5.5.x可大幅度提高服务器负载能力

到现在PHP5.5.x已经发展到5.5.6了,经过半年的发展已经非常稳定,并且解析编译代码的性能比php5.4.x高不少,同时php5.5.x内置了Opcache。使用Opcache可以显著提高PHP服务器的负载能力,大幅度降低语法解析编译所占用的CPU时间。

Zend OPcache 通过 opcode 缓存和优化提供更快的 PHP 执行过程。它将预编译的脚本文件存储在共享内存中供以后使用,从而避免了从磁盘读取代码并进行编译的时间消耗。同时,它还应用了一些代码优化模式,使得代码执行更快。

使用OPcache只需要编译时增加参数 --enable-opcache 即可。
当然不要忘记修改php.ini支持OPcache

zend_extension = {PHP_ROO_PATH}/lib/php/extensions/no-debug-non-zts-20121212/opcache.so
opcache.fast_shutdown=1
opcache.enable_cli=1

下面这段是官方推荐的配置参数,可以进一步提升性能:

opcache.memory_consumption=128
opcache.interned_strings_buffer=8
opcache.max_accelerated_files=4000
opcache.revalidate_freq=60
opcache.fast_shutdown=1
opcache.enable_cli= On
opcache.enable= On

我做了个简单的测试。
我在Codeigniter中新建了一个最简单的Controller用来进行性能测试
class Test extends CI_Controller {

public function index()
{
var_dump('hello world!');
}

使用ab进行测试 (ab在Apache的bin目录中)
$ ab -c 50 -n 1000 http://localhost/index.php/test

测试结果

Zend OPcache off    Request per second: 76.51 [#/sec]
Zend OPcache On 使用默认配置 Request per second: 531.42  [#/sec]
Zend OPcache On 使用优化配置  Request per second: 575.66  [#/sec]

可以看出使用了Opcache后,性能提高可不是一点点。

推荐使用:Zend Opcache 控制面板,效果如下图:
Opcache

Hello Wax For iPhone App

Wax是什么?

Wax是一个框架,让你可以用Lua开发原生的iPhone应用。Wax把Lua和Objetive-C的类库 连接起来,也就是说,你可以用Lua使用任何的Objective-C类及框架。

为什么使用Wax?

  • Wax是免费的、开源的。你总是可以改动源代码,以满足自己的需要。
  • 用Lua这种高效脚本语言编写代码可以大大节省时间
  • 可以使用所有现有的Objective-C库
  • 可以让你的App在线更新一些功能,不再需要经过苹果App Store的审核,不过被苹果发现你的应用下载代码的话可能会被拒绝。

    2.7 Apps that download code in any way or form will be rejected
    2.8 Apps that install or launch other executable code will be rejected

    Hello Wax

    新建iOS APP项目,使用Empty Application模板,命名为HelloWax
    下载wax.framework:https://github.com/downloads/probablycorey/wax/wax.framework.zip
    wget https://github.com/downloads/probablycorey/wax/wax.framework.zip

解压缩wax.framework.zip,将wax.framework添加到项目中,选择“Copy items into destination group’s folder”复选框
Wax Add Framework
AppDelegate.h文件,导入Wax包头文件:

# import <wax/wax.h>

AppDelegate.m文件,在application:didFinishLaunchingWithOptions:方法中,[self.windowmakeKeyAndVisible];和return YES;之间,添加代码:
wax_start(“init.lua”, nil);
项目中新建文件init.lua:

require "ViewController"
viewController = ViewController:init()
window = UIApplication:sharedApplication():keyWindow()
window:setRootViewController(viewController)

项目中新建文件ViewController.lua:

waxClass{"ViewController", UIViewController}
function viewDidLoad(self)
self.super:viewDidLoad(self)
local label = UILabel:initWithFrame(CGRect(0, 120, 320, 40))
label:setColor(UIColor:blackColor())
label:setText("Hello Wax!")
label:setTextAlignment(UITextAlignmentCenter)
local font = UIFont:fontWithName_size("Helvetica-Bold",50)
label:setFont(font)
self:view():addSubview(label)
end

运行,搞定,Hello Wax!

Wax Ios Screenshot

关于Wax的语法

Lua中的函数名称不能有冒号。为了补偿这个差异,凡是Objective-C中隔开方法名称的地方,在Lua中都换成下划线。比如说以上程序的UIFont:fontWithName_size(“Helvetica-Bold”,50)对应于Objective-C的[UIFont fontWithName:@”Helvetica-Bold” size:50]
Lua没有像Objective-C那样的继承体系。Lua中根本没有类。
想通过Lua创建一个Objective-C类,就要使用waxClass{“CLASS NAME”, “PARENT_CLASS”}这个函数。你添加到该Lua文件的所有之后的函数(在同一个文件里面)都会作为实例方法,自动添加到新的类。

waxClass{"ViewController", UIViewController}

Wax不支持Objective-C属性。只能使用View:setFrame(someFrame),不能使用someView.frame

Hello Wax 的代码

相关资料

Wax
https://github.com/probablycorey/wax
WaxPatch 让你能够使用Wax动态的改变iOS APP的行为
https://github.com/mmin18/WaxPatch
Lua语法说明
http://www.cnblogs.com/ly4cn/archive/2006/08/04/467550.html